I wanted the headline to read “Karen”, but out of respect for all the Karens who aren’t Karens, I let common sense prevail….
As mentioned earlier, I’m scared shitless of electrickery. Despite doing a 4 year apprenticeship at a company that dabbles in the manufacturing of audio and video gear, (that was back in the stone age when an amplifier required a huge solid core transformer and televisions were all CRT), to this day, I have an strong and deep rooted distrust of electricity. I’m fairly sure I have a somewhat decent understanding of all (basic) things electric – and that I usually have a pretty good idea about idea about what I’m doing (at least it’s been though through and pondered over for hours). So it’s not that I don’t trust my own skills and understanding of electrickery – it’s the electricity itself I don’t trust.
With that said, there were still a lot that needed to be done to the old girl – electrickery wise:
- It came with heated seats and the assortment of wiring, wire clamps, switches, fuses etc. etc. that goes with them. That had obviously had to go since we’re doing bucket seats.
- It also came with a heated rear window in the soft top. Had to go (both parts)
- Even better, it came with an aftermarket Cruise Control which really had to go.
- It came with speakers. Those had to go incl. the wiring and most of the wiring for the stereo as well.
- Has an electrical aerial. Cables for motor and signal must go along with the aerial itself.
- A couple of relays in the engine bay also looked a bit “odd” – could those go?.
- Getting rid of the center console meant the switches for the power windows had to be relocated. I thought about getting rid of the electrical windows all together (KISS), but realizing the weight of the mechanical setup is basically the same as the electrical one, decided on a pass for that option. (it would also mean a ton more work which I didn’t need)
1-6 are mostly getting rid of stuff and looking at poor craftmanship, so let’s do 7 first.
Center Console Delete (#7)
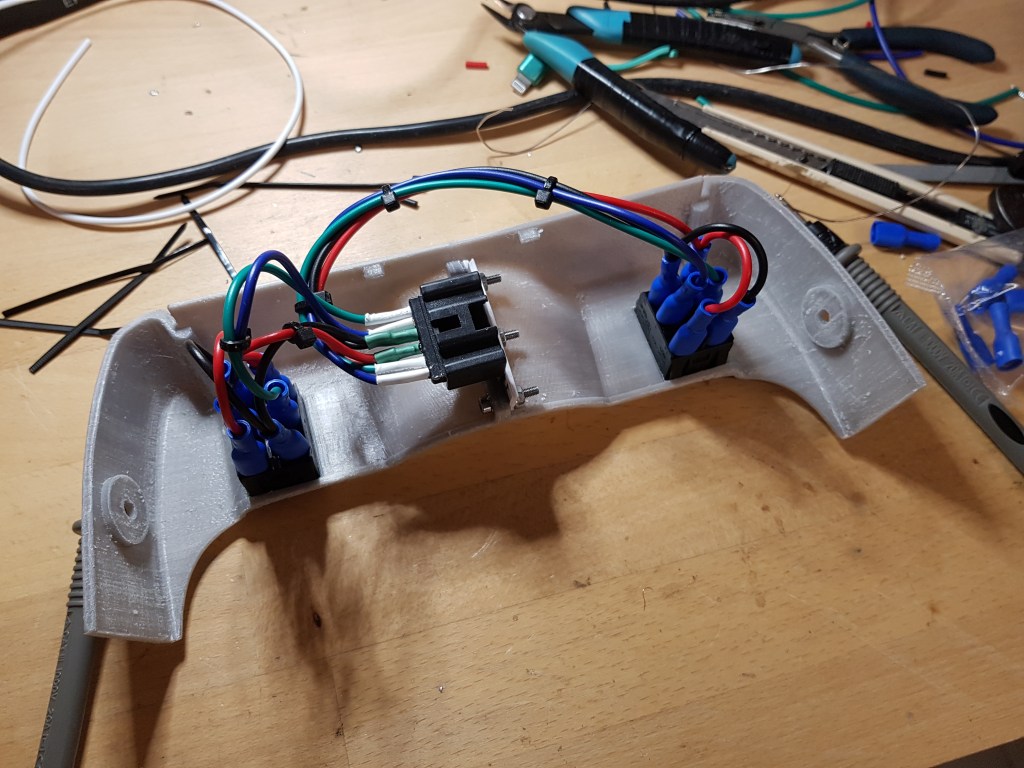
This is the final result (minus being prettied up – Once it gets a coat of spray filler and a bit of matching, more or less, color, I reckon it’ll look half decent)

Doodled in Fusion 360 and printed on my old Anet A8 (yep, the one that’s famous for burning down peoples houses. I bought this maybe 5-6 years ago and it has served me with no issues whatsoever since. Reading as of right now where it’s printing an iPhone holder for my BILs DoKa says it’s printed just shy of 8 km of filament without burning down the house). Unfortunately … The A8 is not a large area printer, 220x220mm, so I had to design it, then split the part into two halves and print them separately. It worked out ok but it’s probably 5g I could save in 3mm nuts and bolts and glue and shit, so it will be rectified eventually. (If you know anyone with a larger than Anet A8 print area, please ask them if they need a new friend).

Last count tells me I did 17 prints until I was happy (and idiot me realized that a single pole switch wouldn’t work so add another print to the pot) – at 8-9 hours a print, it took a while. Luckily I’m a patient boy/man/old person.
For those interested, the wiring part is actually super simple – all you need is a pair of DPDT (Dual Pole, Dual Throw) temporary switched (meaning they don’t stick in any position except null of course). I stole the female connector from the factory switches so the Center Console Delete piece can be removed by unplugging it.
As for the wiring/schematic – this should give you an idea and an explanation:
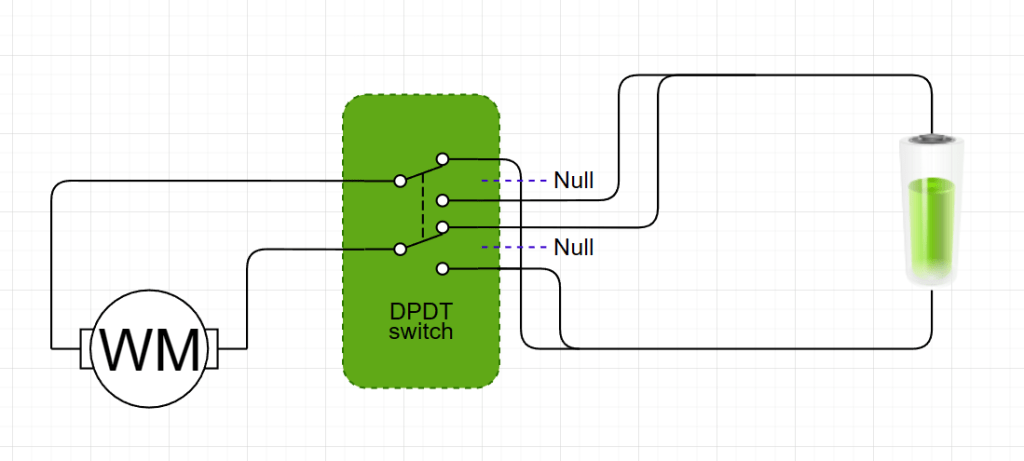
You have the WM which is your Window Motor and in the middle, the DPDT switch. Imagine the purple dotted line is the switch’s null position (draw.io didn’t have a suitable one, sue them) where nothing happens. With the above, it’s basically self explanatory: Connect +/- to the outer terminals on one side of the DPDT and use the common for the motor. Then do the same on the other set of terminals on the DPDT, except flip +/- of course.
That’s it basically, question or comments below.
Yes – the 3MF files are right here – they take up very little space, so there’s all 4 files in there. Full panel with and without cutout for switches and left side with and without cutout for switches (In case you ask me to upload the Right side of the CCD, it’s time to step away from the 3D printer)
3MF files for printing your own Center Console Delete – Final Final Updated final v. 001.2
Bullet points 1-6:
Let me just post some pictures, because, why the hell not:
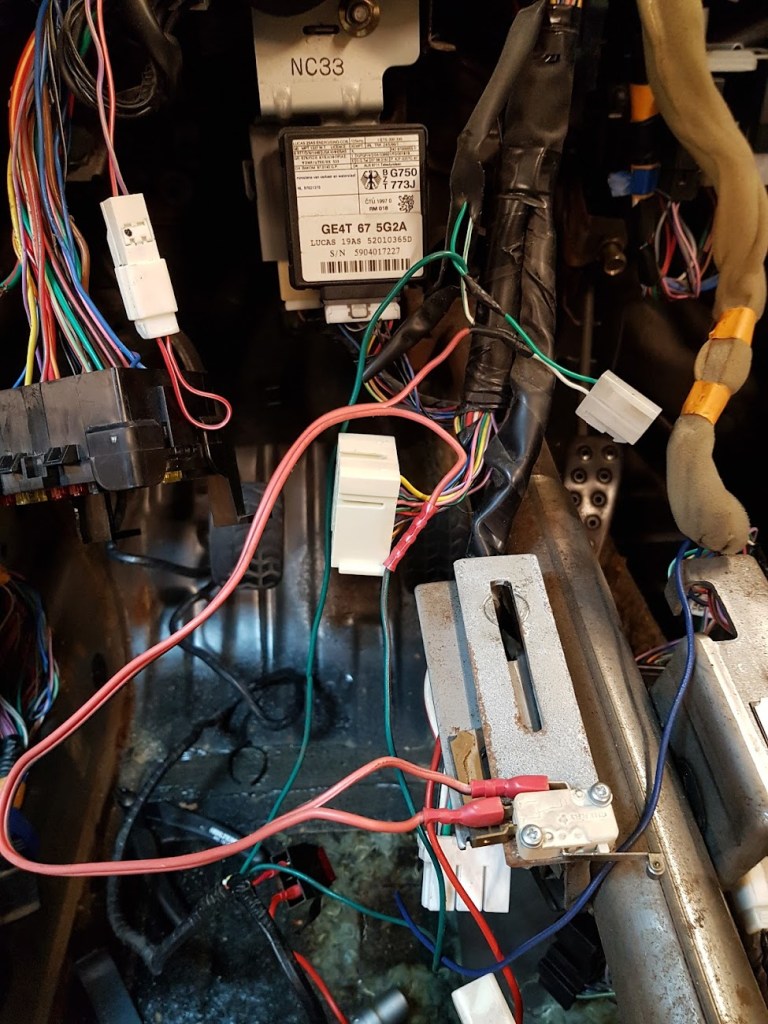
This is what the wiring for the Cruise Control looked like. Notice the 200g metal bracket for holding the disable switch that’s activated by the brake pedal. Work of art if you ask me!.

This is how they stole the signal from the speedometer. Don’t have a close up of the connection with the tape removed, but it looked something like this:

Only a bit smaller. Remove the insulation from a cm of wire without cutting it, then wrap the new bit around like 4-5 times and then smother it in soldering wire. It’s going to hold no doubt, but removing it without burning the wire was an exercise in restraint.
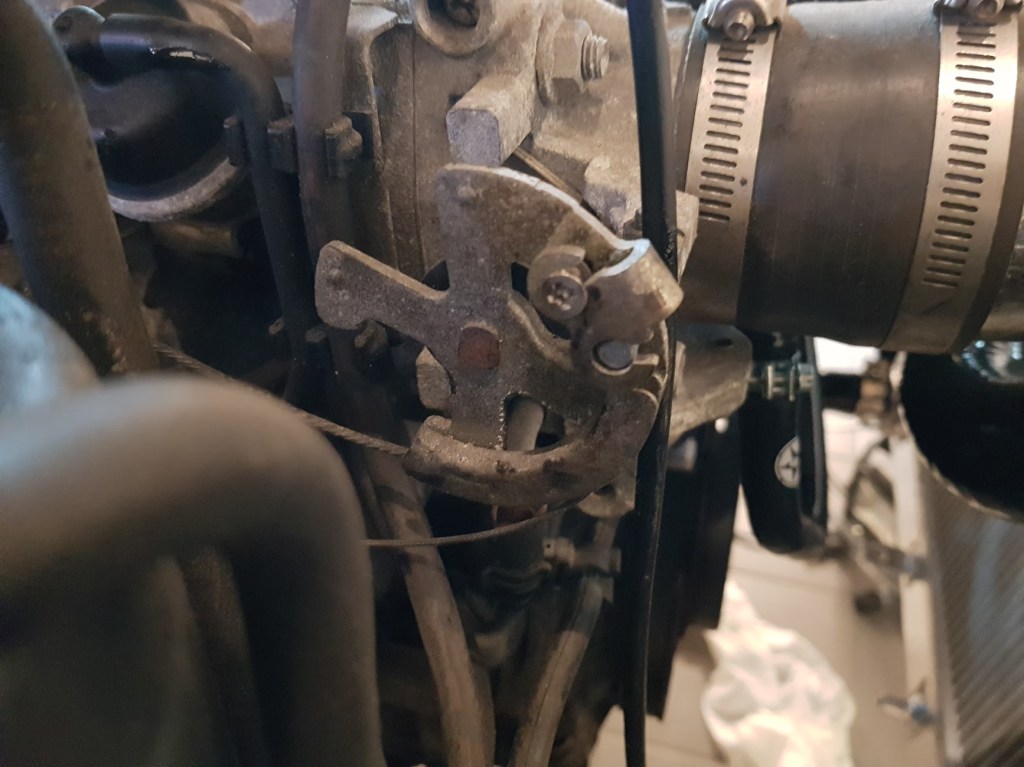
This part isn’t strictly electrickery but the business end of the the Cruise Control. Notice how the second throttle cable (yes, it was a mechanical CC) is attached with what looks like a wood screw. I can deal with a lot of things, even stupid people. What I can’t deal with is sloppiness. If you want to do something, either do it right or don’t do it at all. Half arsed jobs gets me like nothing else.
In the end – this is all that was removed with the CC (control device thingy weighs a kg or so alove)


Something on heated seats perhaps?
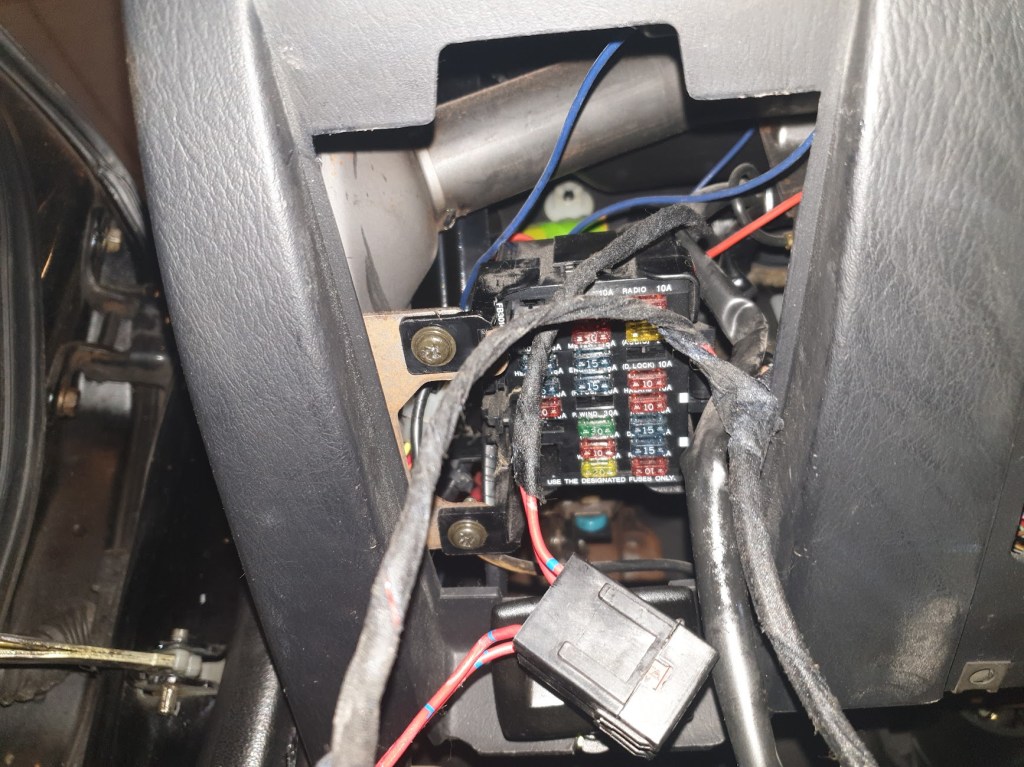
This is how you steal power for your heated seats. The black box is a fuse holder. Those can be free to rattle around – it’s perfectly fine.
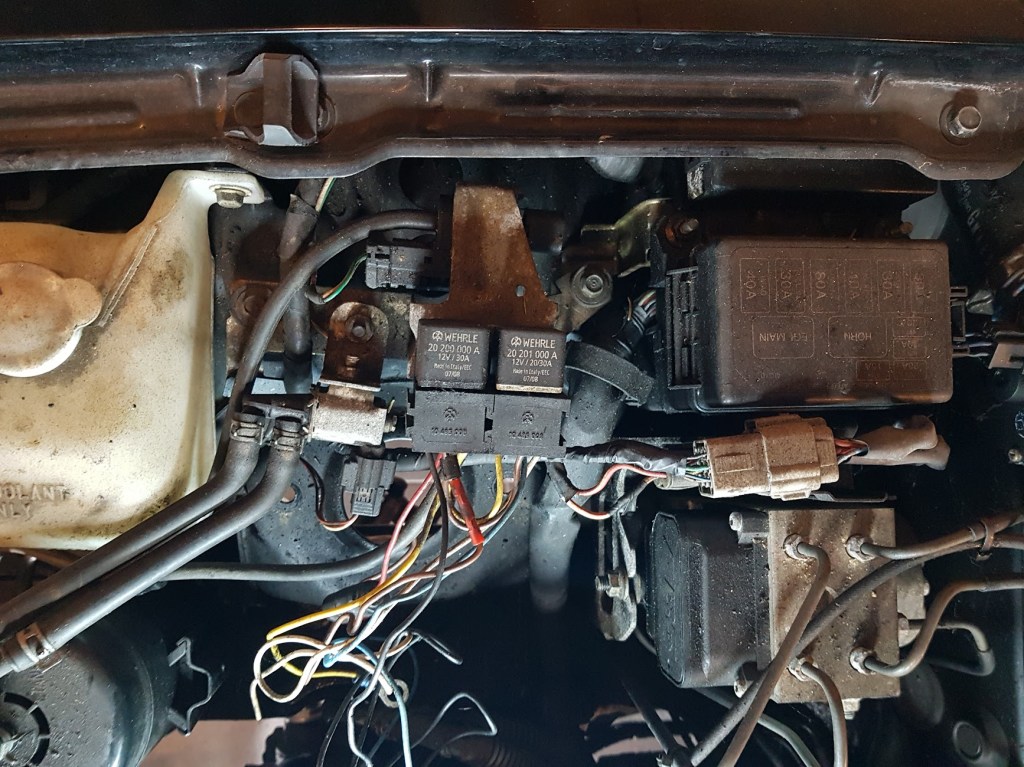
This is after I started pulling the wires you see coming from the two relays. They were stuffed in beneath the relays and once I pulled them out, turns out, that only a single wire from those two relays were connected. And that was to ground. Some ping pong with some nice virtual internet people and we decided that at some point, some mong who shouldn’t have access to tools someone smart decided to make a automatic running headlights and they either couldn’t get it to work and decided to just leave the pieces in there because fuck it, or it broke at a later point and whoever sorted it decided to get rid of the automatic running headlights without removing the actual parts because, fuck it. Anyway, it’s all gone now.
I’m guessing the old gal started life as the cheapest model possible and then:
- No heated seats // Easy fix, look here: *Burns driver and passengers’ bottom*
- No cruise control // Easy fix, look here *Crashes car with stuck throttle*
- No automatic driving lights // Easy fix, look here *Burns the entire car*
- No aircon – Luckily no-one decided to “improve the situation”
How it managed to survive – No idea but duly impressed.

Final Words
ok. So this wasn’t strictly (or as much as I’d liked) on electronics, but sometime later, over winter probably, there’ll be a lot more talk about electricity. I have a cunning plan for simplifying the whole making a new harness and getting rid of everything not needed. The standard loom contains e.g. all the wiring for the a full AC system, wiring for factory Cruise Control etc. that I will never need. There’s also multiple places where the wiring is redundant which could save a few grammes as well. We’ll get to that in due time.
To be cont’d.
Almost forgot: As standard, the main 12v wire going from the battery to starter/starter solenoid is routed beneath the car strapped to the PPF with the wires for the reverse and neutral switches coming from the gearbox going the same way. Those were moved into the car instead. Below the right side door (passenger side in my world), there’s already a plastic pipe that easily takes all of them. There’s even a hole in the firewall that fits the 12v cable incl. rubber grommet, so why Mazda decided on the other solution, no idea.
